The Value of CMM Controller Retrofits
In this case, new controllers for two coordinate measuring machines — one 26 years old — with new programming software offers the possibility to enable multisensor inspection of critical, turned aerospace components.
#techbrief
Edited by Derek Korn

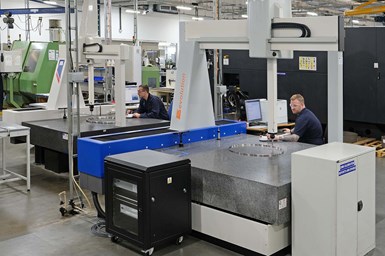
These two LK Metrology CMMs, one of which is 26 years old, have been upgraded with new controllers and software as a means of future-proofing the equipment at England’s Cross Manufacturing. (Photo credits: LK Metrology)
At one of two production units in Devizes, England, operated by sealing specialists Cross Manufacturing, two coordinate measuring machines (CMMs) built by LK Metrology in 1997 and 2007 have been given a new lease on life following upgrades. The upgrades involved the OEM future-proofing operation of both machines by retrofitting multiwired NMC300 controllers with updated firmware and software. Among the many advantages is the ability to deploy different types of sensors in addition to touch-trigger probes. Within the scope of the project, two new Renishaw PH10MQ motorized probe heads were also fitted.
As a result of the improvements, the sealing design and manufacturing specialist gained the ability to use the Renishaw SP25M tactile scanning probe it has purchased, which it is hopes will cut metrology cycle times by at least one-third when implemented in early 2024. Additional types of contact and non-contact sensors might be integrated in the future should Cross Manufacturing choose to extend the CMMs’ capability and consolidate other automatic measuring functions into a single metrology routine.
Featured Content
Located on the shop floor in one of two adjacent sites in Devizes, the CMMs are an LK G90C 10.10.8 and an LK Evo 15.15.10 having nominal inspection volumes of 1,000 by 1,000 by 800 mm and 1,500 by 1,500 by 1,000 mm, respectively. They fulfill a critical role serving the company’s turning department, where brush seals ranging in size from 6 feet (1.83 m) down to 4 inches (102 mm) in diameter are produced in small batches for high-temperature gas-turbine applications in the aerospace and power generation industries. The former sector accounts for the vast majority of throughput, particularly for the U.S. market, with more than 80% of the manufacturer’s output being exported.
Senior Project Manager Mark Bolwell says that most of the company’s parts are 100% inspected. “Upgrading our CMMs means that we will be able to increase throughput by introducing tactile scanning, enabling us to support ever increasing demand without having to invest in another CMM at this time,” he explains. “We are supported admirably by LK Metrology’s applications engineers, all of whom are knowledgeable and never cease to be helpful.
“It is testament to the build quality of the LK Metrology machines that, so many years after they were built, they are still able to underpin our metrology and traceability requirements,” Bolwell continues. “The manufacturer’s UKAS-certified engineers calibrate them annually and every morning we cross-reference the accuracy of the two machines using a calibration ring to ensure the measurements are verified.”

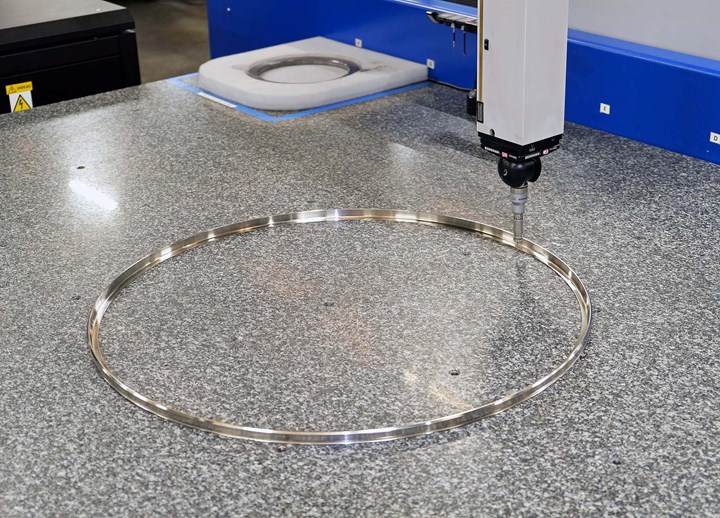
This brush seal is being inspected on Cross Manufacturing’s upgraded Evo 15.15.10 CMM.
Dave Eldridge, lead inspector for aerospace and the power generation products, notes that despite their age, the CMMs measure tolerances from ±0.002 inch (±51 microns) down to ±0.0002 inch (±5.1 microns), a level of process capability that requires a very high measurement uncertainty. “Almost every part we inspect is symmetrical and relatively flat, whether it is a finish-machined product, a segment of a large ring or a fixture for securing components during batch production.
“Most feature measurements are consequently 2D, and three-quarters consist of CTQ (critical to quality) for ensuring correct fit and performance in a turbine,” he continues. “Surface finish is generally in the range 32 to 64 center line average (CLA), which is currently checked separately on other equipment. However, now that we have multisensor capability as a result of the retrofits, we might decide to carry out that function in-cycle on the CMMs using an LK Metrology surface roughness probe, saving a second inspection operation.”
Repeated transfer of parts between the lathes and the CMMs on the shop floor is frequently needed for everything from pre-manufacturing checks through to final part inspection and sign-off. In the case of aerospace brush seals, certification is nearly always performed by trained Cross Manufacturing personnel on behalf of the customer under source-released parts agreements. Similar checks are performed on a large proportion of the products destined for the power generation sector.
Approximately 20 shopfloor employees have been trained by LK Metrology to use the uprated CMMs, five of whom are also qualified to create and optimize inspection cycles using LK’s Camio 2021 programming, analysis and reporting software. Most recently, an offline Camio station was supplied to enable programming while inspection is in progress on the CMMs.
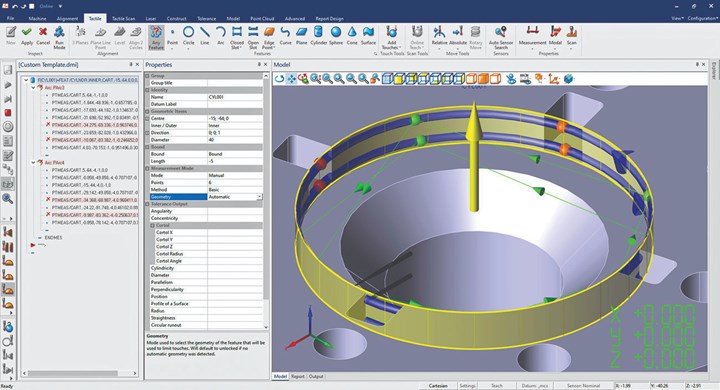
According to LK Metrology, Camio 2021’s geometry validation reduces the time for preparing new inspection programs by automatically detecting which surfaces of the CAD model should be used to measure the feature. It’s been designed to ensure that all measurements are taken on suitable surfaces automatically and at the same time provides the programmer with the option to modify the default settings and selections.

Camio 2021 orientation tolerancing automatically determines the appropriate relationship to a secondary datum based on the nominal feature definitions.
While the feature is being programmed, the CAD simulation highlights the geometry used for the validation and previews the measurement sequence. This combines with the Teach Path view to provide a full visual and numerical evaluation of the programming sequence prior to executing the touch points or scanning sequence, enabling the programmer to get the inspection sequence right the first time when programming online or offline. Other improvements have been made to the programming workflow by extending the advanced picking function to touch points and scan paths on a CAD model and to indicate the selection of existing measured features.
New for Camio 2021, probe self-centering enables the center point of a V groove to be automatically located and measured using a scanning probe. This replicates hard gaging and measurement using gage balls, typically used for gear tooth inspection and measuring countersink depth. Probe self-centering responds to the continuous deflections of an analogue probe in real time to locate the midpoint between two surfaces.
Camio 2021 orientation tolerancing automatically determines the appropriate relationship to a secondary datum based on the nominal feature definitions. Any manually specified relationship is ignored, except in cases where a relationship cannot be determined automatically. Tolerance zone shape and relationship to the secondary datum outputs have also been added for enhancing the output of orientation tolerances.
RELATED CONTENT
-
Versatile Soft Jaw Introduces One-Size-Fits-All Technology
This soft jaw technology conforms to any part geometry and does not require removal from the machine tool when switching to a new job. It also saves shops setup and machining time, energy, and cost involved in the design and development of creating a custom soft jaw.
-
Profilometer Choices
Learn the difference between skidded and skidless profilometers that can be used to measure the surface roughness of machined parts.
-
The Anatomy of a CNC Machine IoT Solution
Industry 4.0 is bringing sweeping changes to manufacturing and IIoT is one of its enabling technologies. Early adopters are reaping the benefits.


