Skiving is one of the oldest and most efficient methods for producing certain types of parts on screw machines. This operation is suitable for parts that are long and slender, parts with close diameter tolerances and finishes, and parts requiring truly spherical radii. Interestingly, because of a lack of knowledge and familiarity with the principles of successful skiving, most layout and setup personnel and operators seem to go to any lengths to avoid the process. With a proper understanding of the corresponding applications, tool design, manufacture and the availability of toolholders with the necessary features for simple, dependable operation, skiving becomes a simple operation. Any screw machine shop should be able to run skiving jobs routinely with few, if any, problems.
What Is Skiving?
Conventional form tools are mounted so that the formed cutting edge of the tool is on the centerline of the part, cutting radially. Cutting action is determined by the combination of radial clearance angle and top rake angle. Diameters are controlled by advancing the forming tool toward the center of the part. But difficulty can be encountered in forming long parts because the entire form contacts the workpiece at one time. The smallest diameter is formed to its finished size at the same time that all the other diameters are being formed, increasing the likelihood of premature part break-off.
Featured Content
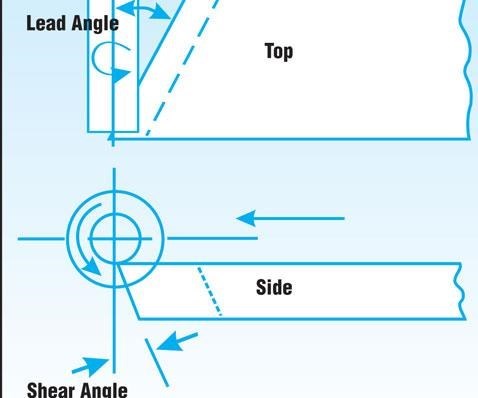
In skiving, cutting action is determined by the combination of shear angle and lead angle.
Skive tools are mounted so that the formed cutting edge of the tool is advanced into the workpiece below center, cutting tangentially. Cutting action is determined by the combination of shear angle and lead angle. Part diameters are controlled by raising the tool towards the center, and the form is ground along the full length. The cutting edge is obtained by grinding the shear angle on the end of the tool and the lead angle across the width of the form.
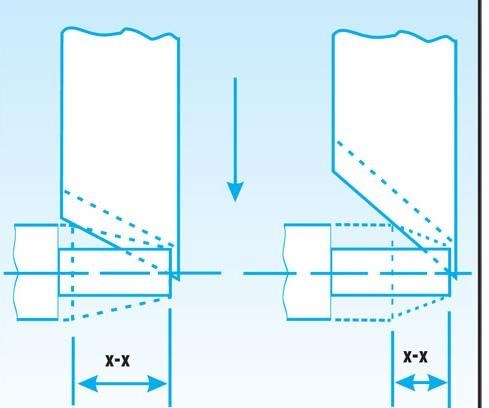
The lead angle should be as short as practical because the steeper the angle, the more throw (and cycle time) is required.
Since only the part of the tool that is in contact with the workpiece at any given time is actually cutting, the part is not weakened until the portion of the tool that forms the smallest diameter of the part actually passes below the centerline. Furthermore, as any portion of the tool passes under the centerline, that diameter is completely formed to size and the tool exerts no further cutting pressure on that area of the part. All cutting action takes place in the area between where the tool contacts the part and where it passes under center.
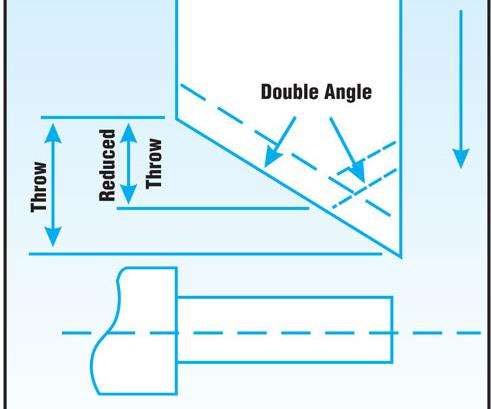
In some situations, it is possible to grind a double angle to reduce throw, as shown here.
The shear angle affects the cutting action, but unlike the top rake on form tools, it does not affect the part diameter relationship. This angle can be varied until the best possible cutting action is obtained. Too blunt of an angle will tend to cut hard and deflect the part, causing dimensional errors and poor finishes. Too steep of an angle causes the cutting edge to burn out prematurely, again affecting diameters and finish.
Approximately a 20-degree shear angle and a 20- to 30-degree lead angle are typical starting points, but a little experimentation can produce surprisingly different results in finishes, tolerances, cutting action and cycle times.
Advantages Of Skiving
Since skiving is a freer cutting operation, feed rates can be increased approximately two to three times for ferrous and difficult-to-machine materials. These adjustments offset the increased throw time required because of the lead angle. At times it is possible to grind a double angle to reduce throw.
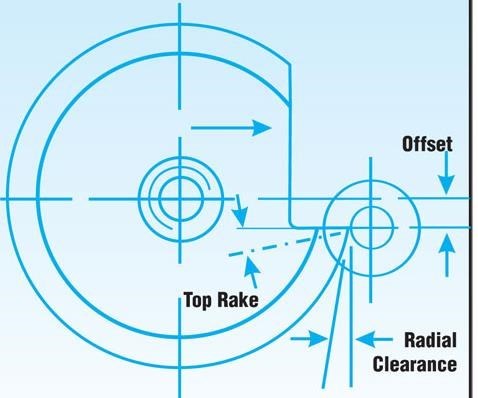
With conventional form tools, cutting action is determined by the combination of radial clearance angle and top rake angle.
Another advantage of skiving is that, since skive tools cut tangentially instead of radially, step differentials remain unchanged and angles do not have to be corrected, simplifying tool design. Since diametral corrections are not required (as in conventional tools) skiving is about the only way to be assured of forming a perfectly spherical radius on a workpiece. Diametral corrections flatten radii into ellipses, which are almost impossible to produce with conventional radius dressing equipment.
In addition to being used for long parts, skiving is used successfully for parts requiring close diameter tolerances or finishes. Much closer tolerances can be maintained because part diameters are controlled by raising or lowering the skive tool (as in a shaving operation) instead of feeding the tool against a stop. For the same reason, tool wear does not affect diameter dimensions directly (except through poor cutting action).
Better finishes can also be obtained with skiving. As the formed portion of the tool continues to advance under the center of the part, it produces a shaving or burnishing action of the part. Carbide tipped tools are particularly recommended where very good finishes are required, since carbide does not gall or weld as high-speed steel might.
Although a certain amount of this burnishing action is desirable, too much drag can cause the part to spring or deflect. Therefore, most skive toolholders are built with a ¼-degree maximum back taper to prevent excess rubbing as the tool passes under the workpiece. However, while eliminating drag, this back taper causes tapers in the part. In combination with the lead angle, it causes the point at which the tool passes the center of the part to drop away from center, thus increasing part diameter.
The amount of taper per side can be calculated with the following formula. Width of skive tool times the tangent of lead angle times the tangent of back taper angle (usually 0 degree, 15 minutes) equals taper per side. These tapers have, in the past, been overcome by either packing up the holder by this calculated amount or by grinding an offsetting taper on the bottom of the skive tool itself. Both of these methods are hit or miss and are a cause of many operating problems. (Tapers are also occasionally caused by deflection of the part, but this can be overcome by use of an end support on the part.)
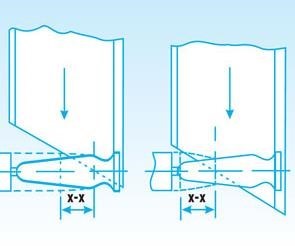
All cutting action during a skiving operation takes place in the area between where the tool contacts the part and where it passes under center (shown here as X-X). The sequence at left shows what happens as the tool advances past center.
Another difficulty encountered has been that most holders are not designed to accommodate extra wide tools and, therefore, necessitate the grinding of T- or L-shaped shanks on the tools. This adjustment shortens resharpenable tool life, increasing the cost of the tools. It also causes rigidity problems in many instances. A further difficulty has been that the depth of form in the tool is limited because of minimal distance between the center of the spindle and the lowest adjustment of the taper wedge in the toolholder.
A Tooling Solution
With these potential problems in mind, Somma Tool Co. introduced a new skive toolholder to fit Brown & Sharpes and other machines. The most unique feature of this tool is a rocker-type taper wedge that can be adjusted to offset part tapers, then locked in that position.
Other features include extra wide tool openings to eliminate cutting down of shanks of skive tools; greater distance from the center of the spindle to the lowest adjustment point of taper wedge to accommodate larger part diameters; rugged construction to eliminate chattering; availability in both rear-slide (for forward rotation) or front-slide designs (for those jobs requiring left-hand rotation); and ¼-degree maximum back taper built into the tools to prevent part deflection.
A variety of parts commonly produced in the screw machine industry can see noticeable improvements through skiving. Examples include ballpoint pen tips, hypodermic needle hubs, ornamental lame finials, fireplace andiron parts and ball-type fittings and parts requiring close tolerances and exceptional finishes. Companies should consider adding this operation to their arsenal for producing unusual parts efficiently and economically.
RELATED CONTENT
-
Understanding CNC Collet Chucks
Workholding for turning is usually fairly basic: The selection comes down to chucks or collets. This article looks at when to consider the collet chuck and what kind might be best for a given application.
-
Collets Vs. Chucks
Find the definition, types and advantages of both CNC collets and chucks for workholding as well as the best applications for each, in this article.
-
The Many Sides of Workholding
Here's a broad look at different ways to approach workholding, from bar feeders to collet chucks to robotics.

