Tight tolerance parts for highly regulated industries such as medical, aerospace and automotive require very accurate and repeatable inspection processes. To that end, a creator of high-precision motion systems has developed a small, portable automation system for handling and gaging machined parts. The DIY system is specifically designed for high-mix applications that produce about 10,000 parts per month or less.
Each Q-Span Workstation from New Scale Robotics includes the company’s smart grippers/calipers, other standard gages and teachable software as well as a Universal Robots (UR) cobot, all on wheels. A couple training sessions with New Scale Robotics enables shop personnel to use the workstation that is configured for their application, but also to deploy it to other applications across the shop floor, without help from the automation company.
Featured Content
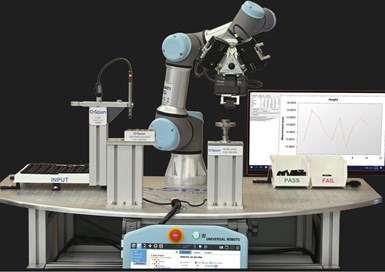
The system automatically picks, measures and sorts parts, and also records all measured data to a PC for statistical analysis. Users of the workstation benefit from eliminating human error, improving process control and quality control (QC) throughput and minimizing QC costs. According to the company, most shops realize full payback on their investments in 10 months through a reduction in labor costs alone.
Starting Small, Staying Small
In 2018, New Scale Robotics’ parent company, New Scale Technologies, released a small and precise smart gripper it had developed that could be used to measure parts, too. The gripper functions as a robotic caliper, measuring the distance between its two fingertips for external and internal features. Working with UR, the company assumed it would be mostly working with material handling applications — the function of most grippers; however, its customers expressed opposing views.
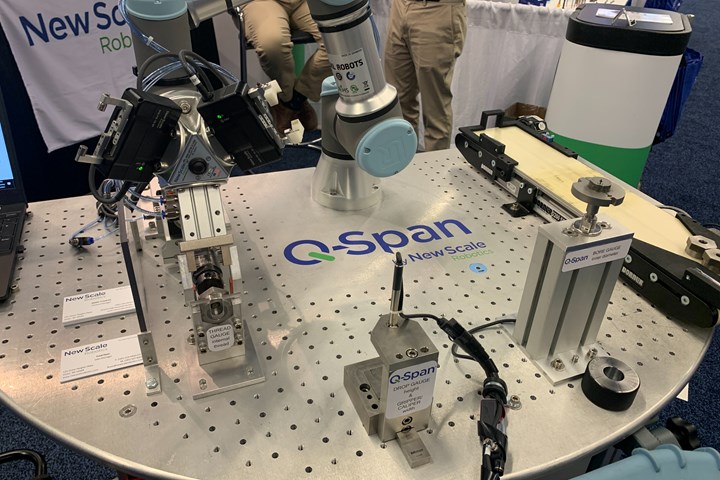
The photo illustrates an example of a combination of gaging equipment that can comprise a New Scale Robotics’ Q-Span automated workstation. Photo Credit: PM
“As customers in those highly regulated industries started using the product and engaging with us, they said the gripper is great, but they needed more accuracy to measure really tight tolerance parts,” says Stefan Friedrich, marketing manager at New Scale Robotics. “And so that was how the Q-Span system came to be. We started integrating other gages into the system.” The Q-Span officially launched in 2020, just before the COVID-19 pandemic began.
The Path to a Customized System
The robotic workstation automates a shop’s existing manual gages and gaging techniques, incorporating preferred metrology tools such as calipers, thread gages, height or drop gages, LVDT probes, bore gages, go/no-go gages, air gages, laser micrometers, vision systems, 2D telecentric profilers and more.
Best implemented in an application where there is repetitive manual gaging happening that also is time consuming, the Q-Span Workstation is mostly useful for replacing inline manual gaging processes that take a machinist away from machining. It is especially appropriate for low- and high-volume, high-mix applications. Ten thousand parts a month or less has been the company’s rough benchmark for volume, according to Friedrich. If a shop is producing much more than that, it probably needs a higher speed robot or inline vision system, he explains.
Because there are many tooling options for this automated workstation, New Scale Robotics asks its customers many questions prior to developing a custom system for a specific application, which is how all Q-Span systems are created. Besides understanding what parts are being measured by reviewing part drawings, specs and tolerances, knowing what tools the shop has been using for measurement is critical.
“It is very much dependent on what the customer’s throughput is, where they are within their production process, and where the part needs to be gaged. Is it inline or is it offline or in the QC lab?” he explains.
New Scale writes a software application, called a URCap, that runs within UR’s main interface. It is similar to how companies write apps that run on a smartphone or tablet. Once the customized system is created, it is controlled by UR’s main Polyscope interface through a teach pendant. New Scale’s software app runs natively on the robot. “In the same interface that you're using to tell the robot to move from point A to point B or to depalletize a tray, you're also able to program our gripper right in that same program,” Friedrich explains.
The Q-Span system provides flexible tools that can be used for redeployment, including the UR+ products that can be attached to the cobot such as conveyors and grippers. Once the system is configured, it is controlled by UR’s main interface through a teach pendant. UR’s software app runs natively on the robot.
He adds that all measurement data is exported through one standard interface. Then, that data is collected by the user and can be exported or imported to the user’s statistical process control (SPC) software or a simple Excel spreadsheet.
Preparing for Deployment
After New Scale Robotics designs and configures the custom workstation, it is time to integrate it on the shop floor. First, however, quick on-site and off-site training is involved. Because UR is the only robot the company integrates in its systems, New Scale Robotics encourages one person from the shop to attend an off-site, two-day Core training at one of UR’s locations or one of its certified distributor’s training locations in the U.S. Once the training is complete, that person is considered capable to use the robot. Therefore, when the Q-Span system integrator arrives on-site, he/she does not need to teach robot fundamentals. Rather, the integrator teaches the new robot champion how to feed parts into the system, and use the gages incorporated in the workstation.
“We usually spend about two days on-site with the customer,” Friedrich says. “After that, ideally the shop will know how to use the system and can redeploy it themselves.”
New Scale Robotics keeps the deployment process simple. The company tries to emulate the manufacturer’s manual gaging process to create Q-Span system’s automated process, so less validation is needed from the QC department when deploying the system, according to Friedrich. The company also provides flexible tools that can be used for redeployment, including the UR+ products that can be attached to the cobot, such as conveyors and grippers.
Designed for mobility, the system can move from a metrology lab where it measures trays of parts, to a lathe where it automates inspection coming off the machine. Then, the next day it might pick off parts from a conveyor, for instance.
Remember Thread Gaging
After working in New Scale Robotics’ exhibitor booth at the Precision
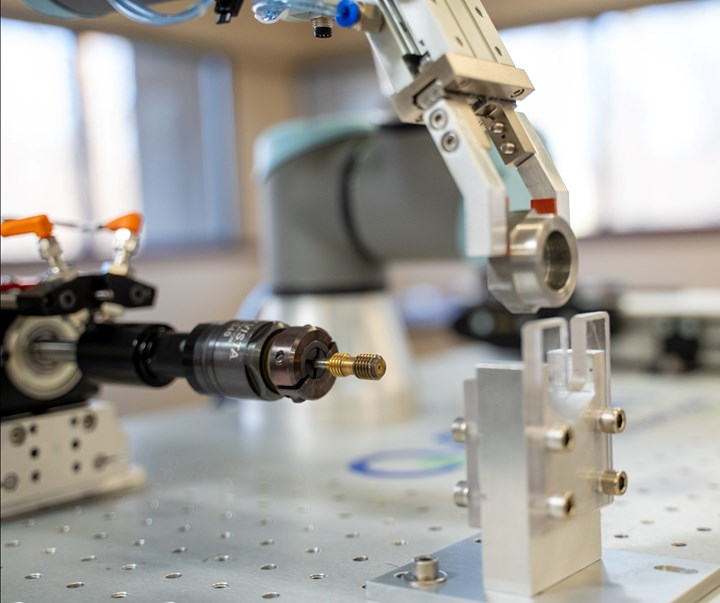
Precision machine shops are likely to be interested in the internal or external thread gaging that can be automated on the Q-Span Workstation. Photo Credit: New Scale Robotics
Machining Technology Show (PMTS) in April this year, Friedrich understands that many precision machine shops are interested in the internal or external thread gaging that can be automated on the Q-Span Workstation.
“We can use a mechanical thread gage that turns a thread gage through the part as kind of a go/no go test,” he explains. “Or, for external threads, we can use a two-dimensional profiler and record the dimensions of the thread with that vision system as a faster, noncontact method.”
RELATED CONTENT
-
Machine-Tending Cobot Fills Night Shift
A collaborative robot helped this shop run a machine tool 24/7 when hiring someone for a third shift didn’t seem to be an option.
-
The Value of CMM Controller Retrofits
In this case, new controllers for two coordinate measuring machines — one 26 years old — with new programming software offers the possibility to enable multisensor inspection of critical, turned aerospace components.
-
How Well do You Know Granite Surface Plates?
Here are some tips for choosing, maintaining and customizing a granite solution that will best meet your shop’s particular inspection needs.


