Micro-Drilling: 9 Questions to Answer Before Beginning
Applications for micromachining continue to grow. Successful machining with small tools calls for a different set of process skills on the shop floor.
#basics #micromachining
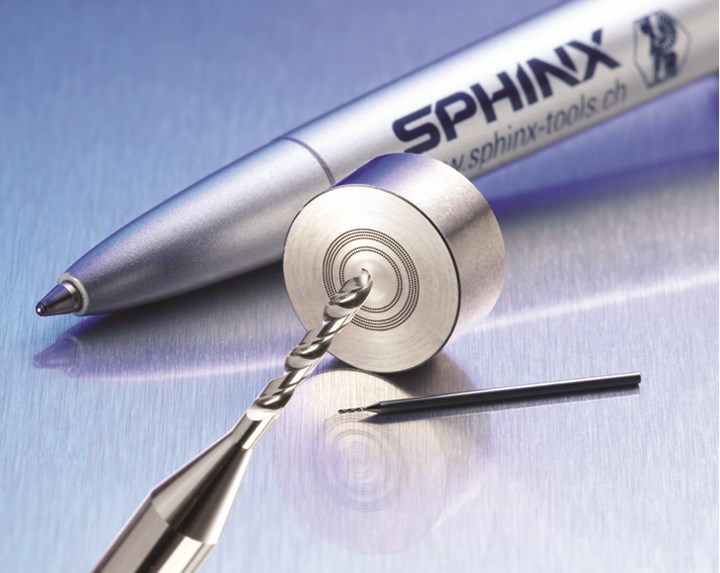
First, let’s try to define micro-drilling. Like so much metalworking vocabulary, hard and fast definitions are often elusive. However, Jack Burley, president/COO at Big Daishowa, a distributor for Swiss micro-drill maker Sphinx’s product line, defines micro-drilling with a number. Burley says Sphinx defines micro-drilling with a starting diameter of 0.05 mm (0.002 inch) and ranging to 2.5 mm (0.10 inch). For the purposes of this article, let’s agree with this definition. He also adds that this benchmark is a moving target, as improvements in production technology and materials used to make these tiny tools continue to push for a smaller minimum starting diameter.
We asked Burley how he goes about qualifying a precision machined parts manufacturer looking to get into micro-drilling operations. He is quick to point out that applying this technology, as defined, takes a commitment from the shop that is different than most other operations the shop has implemented.
Featured Content
“When I visit a shop that is looking to transition to micromachining from more traditional operations, especially drilling above 0.10-inch diameter, there are a series of questions I pose to help them understand how different the process considerations for micromachining are from most other metalworking operations they have dealt with,” says Burley. “Some of these are obvious, but others are more subtle.”
1. How Do You Define Micro?
Micromachining does not necessarily equate to miniature parts. While it’s true that many applications in medical and electronics manufacturing deal with miniaturization trends, many relatively large workpieces require ultra small features that can only be accomplished by micromachining techniques.
“I’ve seen shops where 0.25-inch diameters are the norm, trying to implement 0.060-inch-diameter cutters by simply exchanging tools and scratching their heads when the operation doesn’t perform,” Burley says. “The problem is that when you break through the threshold of 0.10-inch diameter, the physics of machining get much more precise. Correspondingly, the approach to machining must tighten up as well. It’s not a simple substitution, but a disciplined shop can make it work well.”
2. Is Your Equipment Capable?
Micromachining requires a machine tool that has high sensitivity and fine resolution in the feed axis. Machines must also have very precise spindles capable of high-speed rotation with low dynamic runout. Dynamic runout is the measurement of the spindle at speed. It is performed using laser or capacitance resistance technology.
“A class of specialized machines has been developed specifically to perform micromachining operations,” Burley explains. “For shops planning to micromachine on existing equipment, I recommend having the machine allocated for the work evaluated by a specialist to make sure it is capable of sufficiently fine feeds and has dynamic runout well below 0.0001-inch TIR.”

Micro-drills are intolerant of runout. The small tool size accentuates any runout in the machine spindle, toolholder and collet.
3. How Will You Hold the Micro Tool?
Basically, micro-drills are made one of two ways: as a “wire” in which the shank diameter is the same as the drill diameter, and as a standard shank tooling, which uses a 1/8 -inch or 3-mm shank diameter regardless of the drill tip size. The wire drill has cost advantages because it’s less expensive to manufacture; however, it requires a range of collet sizes to accommodate different diameter drills. It is also more difficult to handle because of its smaller OD.
Toolholding technology for wire or standard shank drills is as important to the micro-drilling operation as the machine tool. The maximum runout for micro-tools with drill diameters less than 2 mm (0.080 inch) is 0.0025-mm (0.0001-inch) TIR measured at four times the diameter.
“The toolholder and machine spindle form a system that must deliver the drill tip into the work as precisely as possible,” Burley says. “Our tests show that high precision collets, made to class AA standards, can provide stable runout and afford easy tool changes. For ultra-small diameters on a machining center, the collet is normally hand clamped directly into the spindle to eliminate positioning errors from the automatic toolchanger.”

High precision collets, made to class AA standards, provide stable runout and afford easy tool changes. Cleaning the collet during tool changes helps maintain repeatability.
4. What Material Will be Machined?
The key to micro-drilling is the tool’s ability to produce even wear across all cutting edges in order to reduce the force required to evacuate chips and prevent chips from welding themselves to the flutes. Therefore, the surface finish on these drills must be ultra fine.
Matching the material to be drilled to the cutting tool is similar to conventional drilling operations except that in micro-drilling, the cutting edges must be very sharp and dead on center. There simply isn’t the structural integrity in these tiny tools to “bull” their way through a workpiece.
“Micro-tool makers can influence the performance of tools in different materials by varying the geometry of the drill and the material from which the tool is made,” Mr. Burley says. “Manipulating the web thickness of the drill point allows us to add or delete point strength based on the workpiece material. Although HSS is the most forgiving material, but nano-grain carbide gives the longest life. I recommend that the shop work with the tooling vendor to establish a starting point for cutting data and tool specs based on the job because each vendor makes tools a bit differently.”
5. What are Your Tolerances?
For many micro-drill applications, the ability to cut such a small hole is sufficient. However, as micro-drilling operations proliferate, there is increasing demand to hold these tiny holes to similar tolerances for size and surface finish as non-micro holes.
“Accuracy of the drill is very critical in micro-drilling,” Mr. Burley says. “You had better be on size because the operation is basically a ‘one shot deal.’ To cover the size range needed, we offer micro-drills, drills and center drills in 0.01-mm (0.0004-inch) increments.”
“Tighter hole tolerances have led to the development of finishing tools,” Mr. Burley continues. “Micro boring and reaming tools are available to improve the typical 20-rms surface finish created with drilling and improve size and straightness well beyond what a drill alone can produce. Once the process basics for micro-drilling are in place, feed control, spindle and toolholder runout; cutter material and geometry; and cut data—micro boring and reaming to hold 0.0001-inch tolerances—become very doable.”

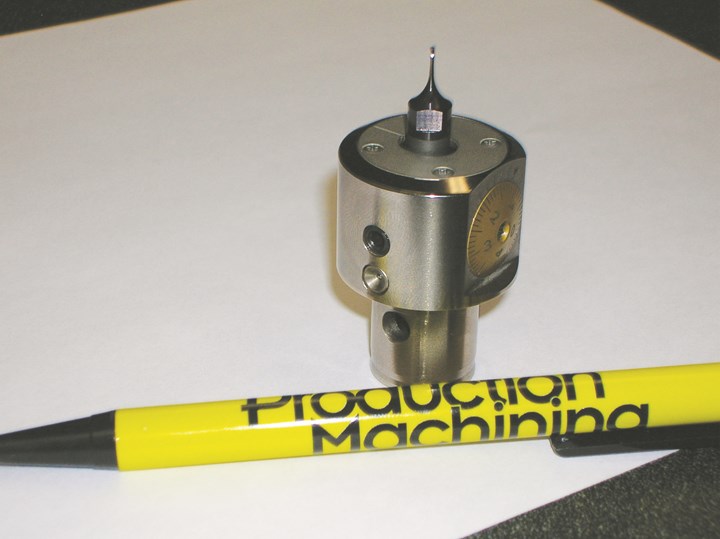
Micro-drilled hole tolerances are tightening up for some applications. Micro-boring and reaming tools are available for finishing drilled holes. The boring bar shown here is 0.025-inch diameter with a 1-micron adjustment on the holder and a 7-mm shank.
6. What Hole Depth is Needed?
Deep hole drilling with micro-tools is improving as the tools and techniques improve. Center drills with a reverse-diameter tolerance (that is, +0.004 mm, -0) rather than the standard tolerance in the opposite (negative) direction provide a pilot hole for deep drilling operations. This operation allows the long and structurally weak drill to enter a slightly oversize hole to prevent binding and breakage.
“We successfully micro drill holes with 10 to 1 and as much as 15 to 1 length-to-diameter ratios,” Mr. Burley says. “In addition to using a center hole to guide the drill, we recommend a pecking routine. For hole depths two times the diameter, I call for a bump, bump, bump, retract routine. With each additional two times the diameter, I add an extra bump and full tool retraction. A machine tool with fine servo control is critical in this operation.
“Because micro tools generate small chips, less heat from cutting is transferred to the chip. This routine is necessary to clear the chips and cool the drill. We recommend using mist oil/air for chip evacuation and cooling,” he adds.
7. What is the Drill’s Entry Point?
Ideally, a micro-drill is best applied when it can be fed perpendicular to the workpiece. However, not every hole has the luxury of perpendicularity. There are angles.
According to Burley, if the entry point on the part that’s planned to drill is less than 10 degrees, careful feeding of the drill can accomplish the operation without the drill walking across the angular surface. Beyond 10 degrees, micro-drills need help getting a purchase on the workpiece. Shops can get around this problem by milling a small notch on the entry angle, effectively creating a perpendicular starting point for the center drill followed by the drill.
Another technique to micro-drill on an angle requires a machine with a B-axis swivel spindle. First, the spindle feeds the drill point perpendicular to the entry point of a workpiece. Once the drill makes contact with the work, the B axis swivels to the angle spec and drills the hole. Using this method, only one tool is needed.
8. How Many Holes?
The next question Burley wants to know from a prospective micro-drilling shop is how many holes are needed in the workpiece. Micro-drilling can be used effectively in volume production both in workpiece quantities and number of holes per part. (see “Try This on for Size” at the bottom of this page.)
“The number of holes needed to be drilled can change the recommendation and specifications of the micro-drilling process,” Burley says. “If the job calls for many holes, I try to optimize the process for maximum efficiency and tool life. For example, I would try to eliminate center drilling if possible to speed production. To do this, a coated tool can be used because of its reduced tool wear. Generally, micro-tools are not coated because of geometry. The thickness of a PVD coating can influence the nominal size of a micro-tool. For volume production, any coating used on the tool must be ultra thin (less than 0.001 mm) and very smooth.”
9. What Skill Levels Does Your Shop Have?
Probably as important as all of these questions is whether or not your people transition to micromachining. Handling cutting tools that are smaller than a human hair requires not only new machining process considerations, but understanding the need for gentle handling of these fragile cutters.
“The skills are learnable,” Burley says. “I’ve seen micromachinists who know when a cutter is about to fail or when it is going dull. They can’t tell you why; they just know. It’s a spooky, but valuable skill. In my experience, shop owners must commit to training operators in the specific skills needed in micromachining in addition to investing in the process hardware. Cutting with tools smaller than 0.100 inch is a different animal.”
RELATED CONTENT
-
Important Machining Factors of Carbon Steels
Learn the factors that contribute to carbon steels and their machinability as well as the 1214 steels, 1215 steels and 1018 steels, other grades, and more.
-
Where Micro-Laser Machining Is the Focus
A company that was once a consulting firm has become a successful micro-laser machine shop producing complex parts and features that most traditional CNC shops cannot machine.
-
Micromachining Fundamentals
A number of elements must come together to establish an effective process for machining at a micro level. Here we consider four.


